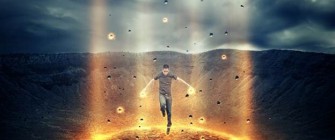
 Preview of Final Results Tutorial Resources Man – sunshine114 Sky – Photoxpress Background – sxc.hu Explosion – sxc.hu Fireball – sxc.hu Crack – sxc.hu Rocks – Creativetuts Step 1 Create a new document and fill it with white. You can choose the size you want but in this tutorial I choose the width larger than the height. Open background stock. Press C to active Crop Tool and make selection of background as shown below: Right click this selection, choose Crop to complete this action: Use Move Tool ( V) to drag it into white canvas, remember to resize to fit the background: Name it as “land”. I want to remove the pile on the right side so on land layer, use Polygonal Lasso Tool ( hit L to active it) to make a selection on the left side with feather = 20: Right click this selection, choose Layer via Copy and we have it on a new layer. Go to Edit-Transform-Flip Horizontal then move it to right side to hide the pile: Hide background layer ( white canvas) then press Cmd/Ctrl+Shift+Alt+E) to merge all visible layers ( “land” and “remove pile” layers). Call the new layer as “land 1″ or whatever you want. Step 2 Open sky stock. You can use another image if you can’t download this sky from Photoxpress but a dark one with dramatic look is a good choice. Use Retangular Marquee Tool to make a selection for the part you want and set feather as 20 ( depends on the size of your picture): Use Move Tool to drag it into our document, downsize and place this layer under “land 1″ layer but above “land” and “remove pile” one. Name it as “sky 1″: On land 1 layer, add layer mask and use soft black brush to remove sky part of land: Duplicate sky 1 layer, apply Flip Horizontal for it then move it to the right like the image below shows: Name it “sky 2″. Add layer mask to remove some parts to make this sky blend better with background: Step 3 To make color of the land fit sky, I use a new adjustment layer for land 1 layer with Clipping Mask. On land 1 layer, go to Layer-New adjustment layer-Hue/Saturation: Step 4 In this step I do a bit retouch for background. Create a new layer on the top. Use soft brush with color #373939 and paint on some parts of sky. I vary opacity of brush as shown below: Change the mode to Multipy 80{0024a325378293d44bbfde08338a1b5a5993525c3fc828ac304446c779020bb4}: Make a new layer ( Cmd/Ctrl+Shift+N) and I use brush with color #9f9e99. Painting on the left side of sky and some parts of background to brighten them. Set the mode of this layer to Soft light 100: Step 5 Open explosion stock. Use Move Tool to drag it into our canvas. Press Cmd/Ctrl+T to scale it down and transform it as shown below: Change the mode to Screen 100{0024a325378293d44bbfde08338a1b5a5993525c3fc828ac304446c779020bb4} and add layer mask for this layer. Use soft black brush to remove the rough edges and the part within this explosion: Name this layer as “burning circle”. Step 6 I use a layer with Clipping Mask to brighten this circle. Take soft brush with color #fda25c. Painting around this circle and change the mode to Hard Light 100{0024a325378293d44bbfde08338a1b5a5993525c3fc828ac304446c779020bb4}:
Article by Photoshop Tutorials. Read entire story here.