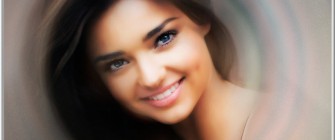
 Sometimes the tools in Photoshop will give you a special. Here I will demonstrate how you can use the Radial Blur filter for an effect that can be achieved very simply but looks great. It can be done in any version of Photoshop even Photoshop7. It will also work with any image. This is the effect I have in mind. I will be using this image. You will find it here It belongs to alubb77 Step 1 : Duplicate the Background Layer by pressing CTRL+J. Step 2 : Go to Filter>Blur>Radial Blur. Step 3 : In the Radial Blur set the Amount to 100, Blur Method to Spin and Quality to Good or Best. Click OK. Step 4 : This is the effect I have got. Step 5 : Click the Add Layer Mask button. A Layer Mask forms next to the layer thumbnail on Layer 1. Step 6 : Press b for the Brush Tool. Make it soft by pressing SHIFT+ (left square bracket) a number of times. To increase the size of the Brush press (right square bracket). To make it small press [ (left square bracket). Step 7 : In the top panel lower the Opacity of the Brush to 25{0024a325378293d44bbfde08338a1b5a5993525c3fc828ac304446c779020bb4}. Let the Flow remain at 100{0024a325378293d44bbfde08338a1b5a5993525c3fc828ac304446c779020bb4}. Step 8 : Place the Brush where the face is and click a number of times. The face will begin to appear. Step 9 : Click some more with Brush to reveal the face and whichever portions you wish to uncover. Here is the finished effect. Other tutorials are here <!– google_ad_client = “pub-0945270783907167”; google_ad_width = 300; google_ad_height = 250; google_ad_format = “300x250_as”; google_cpa_choice = “CAEQoMe7zgQaCAdbJr4H4S4tKIjt5qEC”; //–>
Article by Photoshopper27. Read entire story here.