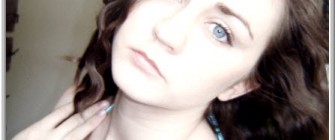
 A light leak is a hole or gap in the body of a camera where light is able to “leak” into the normally light-tight chamber, exposing the film or sensor with extra light. This light is diffuse, although parts within the camera may cast shadows or reflect it in a particular way. For most purposes this is considered a problem. Within the lomography movement it is seen as a positive effect, giving photos character. (Wikipedia) This effect liked by some can be replicated in Photoshop. This is the processed image. The original image is below. I will be using this image for the tutorial. You will find it here It belongs to Aconyte-Stock Step 1 : Click the Create New Fill or Adjustment Layer button. Step 2 : From the pop up menu click on Hue/Saturation. Step 3 : In the Hue/Saturation drag the Saturation to -100. Step 4 : Change the Blend Mode of Hue/Saturation layer to Screen. Reduce the Opacity to 75{0024a325378293d44bbfde08338a1b5a5993525c3fc828ac304446c779020bb4}. The image looks like this. Step 5 : Click on the New Fill or Adjustment Layer button (as in Step1) and click on Levels. Step 6 : Drag the Black slider shown to 20{0024a325378293d44bbfde08338a1b5a5993525c3fc828ac304446c779020bb4}. The image looks like this. Step 7 : Now click on a Curves Adjustment. Step 8 : In the Curves diagonal drag the top and bottom of the diagonal in the middle slightly at the top and bottom as shown. The image looks like this. Step 9 : Click the New Layer icon. A New Layer 1 forms. Step 10 : The Foreground/Background colors are set to Black/White. Step 11 : Click the Gradient Tool. The Linear Gradient is checked by default. Click at the top to bring up the Gradient Editor. Step 12 : In the Gradient Editor click on Foreground to Transparent Preset. Step 13 : The Blend Mode is set to Normal. Lower the Opacity to 60{0024a325378293d44bbfde08338a1b5a5993525c3fc828ac304446c779020bb4}. Step 14 : Drag the Gradient Tool down in the bottom of the image. The bottom of the image darkens slightly. Step 15 : Click the New Layer icon and a new Layer 2 forms. Step 16 : Press x on the keyboard to change the Foreground Color to White. Step 17 Click the Gradient Tool again. Step 18 : Drag up with the Gradient Tool. The finished image, Other Photoshop tutorials are here <!– google_ad_client = “pub-0945270783907167”; google_ad_width = 300; google_ad_height = 250; google_ad_format = “300x250_as”; google_cpa_choice = “CAEQoMe7zgQaCAdbJr4H4S4tKIjt5qEC”; //–>
Article by Photoshopper27. Read entire story here.