In this tutorial, I’ll show you how to create a surreal, fantasy artwork featuring a melting moon. First, we’ll build the base scene using two landscape images. After that, we’ll add the stars and the moon. Later, we’ll paint the splash and liquid falling from the moon. We’ll create some additional effects, add the lighting and use several adjustment layers to enhance the final result.
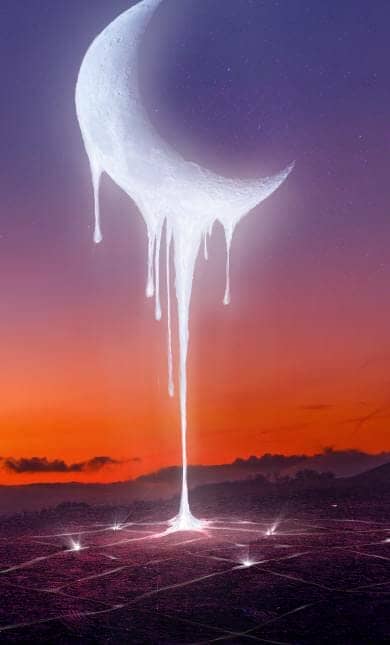
Preview of the Final Result

Tutorial Resources
Step 1
Create a new 1530×1700 px document and fill it with white. Open the landscape image and drag it into the white canvas using the Move Tool (V).

Step 2
Go to Layer > New Adjustment Layer > Color Balance and change the Midtones and Highlights settings:


Step 3
Open the ground image and use the Move Tool to place it onto the existing ground. Click the second icon at the bottom of the Layers panel to add a mask to this layer. Select a soft round brush with black color to erase the sky and background of this image , leaving the ground visible only.


Step 4
Make a Hue/Saturation adjustment layer above the ground layer and set it as Clipping Mask. Bring the Saturation values down to -24:

Step 5
Create a Color Balance adjustment layer (set as Clipping Mask) and alter the Midtones and Highlights settings:


Step 6
Add a Curves adjustment layer (set as Clipping Mask) and decrease the lightness. On this layer mask, use a soft black brush with the opacity about 10% to reduce the dark effect on the midground a little.


Step 7
Make a new layer on top of the layers and use a soft brush with the color #e3a39a to paint on the main canvas. Change this layer mode to Multiply 100% and add a mask to this layer. Use a soft black brush with the opacity about 50% to erase the dark effect on the upper of the sky.


Step 8
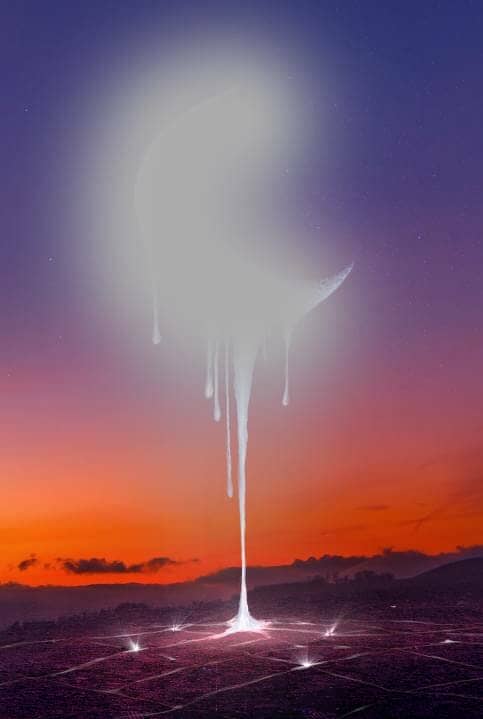
Cut out the moon from the original image and place it onto the top middle of the sky. Flip it horizontally by choosing Edit > Transform > Flip Horizontal. Use the Free Transform Tool (Ctrl+T) with the Warp mode to tweak the moon as shown below:

Step 9
Change the mode of the moon layer to Screen 100%:

Step 10
Create a Hue/Saturation adjustment layer (set as Clipping Mask) to change the moon’s color. Bring the Hue values down to -180:

Step 11
Open the star background images pack and choose the starry3 one. Place this image onto the sky and change this layer mode to Screen 100%. Set this layer below the moon’s one.


Step 12
Add a mask to this layer and use a soft black brush to remove the hard edges and erase the stars inside the moon.


Step 13
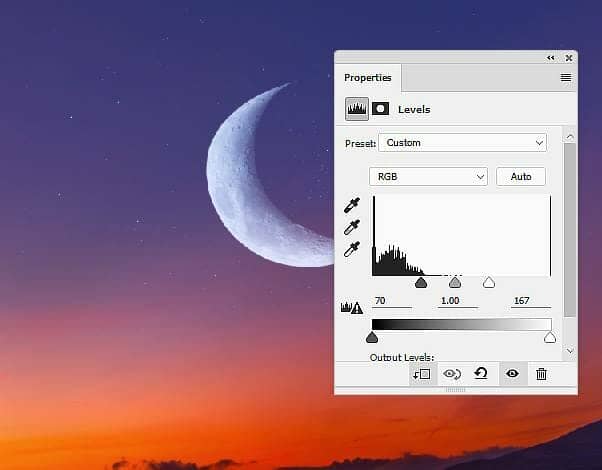
Create a Levels adjustment layer (set as Clipping Mask) to decrease the opacity of the stars and increase the contrast of the starry effect.
Step 14
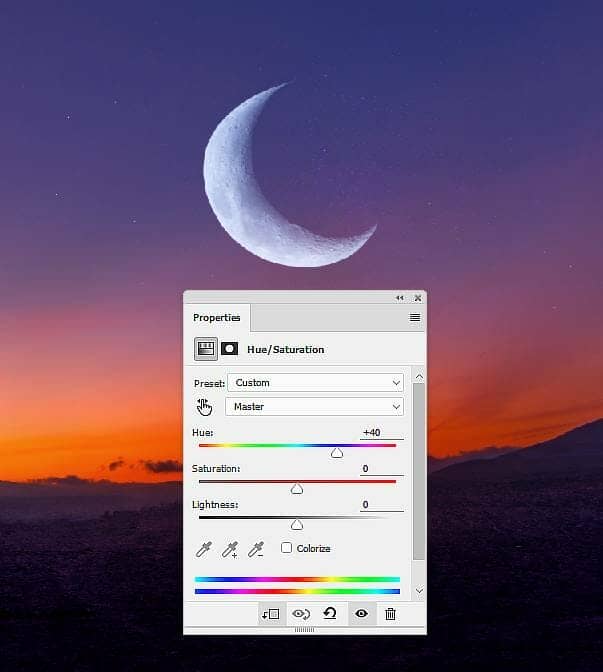
Make a Hue/Saturation adjustment layer to change the color of the stars to fit the background.
Step 15
Open the splatter image and use the Move Tool to place the splatter below the bottom of the moon.

Step 16
Make a Color Fill layer above the splatter layer (set as Clipping Mask) and pick the color #d6dcf6 .

Step 17
Add a mask to the splatter layer and use a medium hard black brush to blend the splatter with the moon and trim the bottom of the splatter.
Step 18
Make a new layer and use a small hard brush with the color #d6dcf6 to paint more details for the existing liquid and on the ground.

Step 19
Create a new layer and use a soft brush with the color #e2e6f8 to paint around the liquid on the ground. Change this layer mode to Screen 100% and add a mask to this layer. Use a soft black brush with the opacity about 50% to reduce the light effect around the bottom of the liquid.


Step 20
Add a new layer and use a small brush with the color #e2e6f8 to paint a network with lines around the liquid on the ground.

Step 21
Double click this layer, choose Outer Glow. Set the color of glow to #bd5d5d.

Step 22
Add a mask to this layer and use a medium-soft black brush with the opacity about 20% to reduce the visibility of the lines on the foreground.

Step 23
Duplicate this layer and change the Layer Styles to Stroke. Set the color of stroke to #6e1515.

Step 24
On this layer mask, use a soft black brush to refine the effect on the middle ground, making it more subtle.

Step 25
Create a new layer and use a small brush with the color #e2e6f8 to paint some highlights on the lines around the network. Change this layer mode to Linear Dodge 100%.
Step 26
Make a new layer and use a small brush with the color #c2c5e3 to paint more drops and details for the falling drops of the liquid.

Step 28
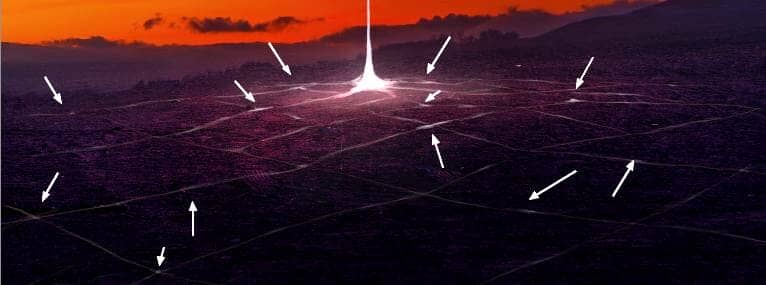
Open the light effect pack and select the images named 26, 42, 29, 39 to add to the positions around the liquid on the ground. Use Ctrl+T to resize these images and make the light’s direction upwards. Change the mode of these layers to Screen 100%.


Step 29
Select all of the light layers and hit Ctrl+G to make a group for them. Change the group’s mode to Screen 100% and make a Hue/Saturation adjustment layer within this group. Bring the Saturation values down to -78:

Step 30
Make a new layer on top of the layers and use a soft brush with the color #adadad to paint some glow around the moon. Change this layer mode to Screen 100% and use a layer mask to reduce the light effect, especially on the moon.

Step 31
Create a new layer and use the same brush to paint around the liquid/drops. Change this layer mode to Hard Light 100% and use a layer mask to decrease the glow effect, making it appear more subtle.

Step 32
Make a Gradient Map adjustment layer on top of the layers and pick the colors #e10019 and #00601b. Lower the opacity of this layer to 20%.

Step 33
Add a Color Balance adjustment layer and change the Midtones and Highlights settings:


Step 34
Create a Curves adjustment layer to enhance the contrast and color of the whole scene. On this layer mask, use a soft black brush with the opacity about 20% to reduce the dark effect on the ground.

Final Result
