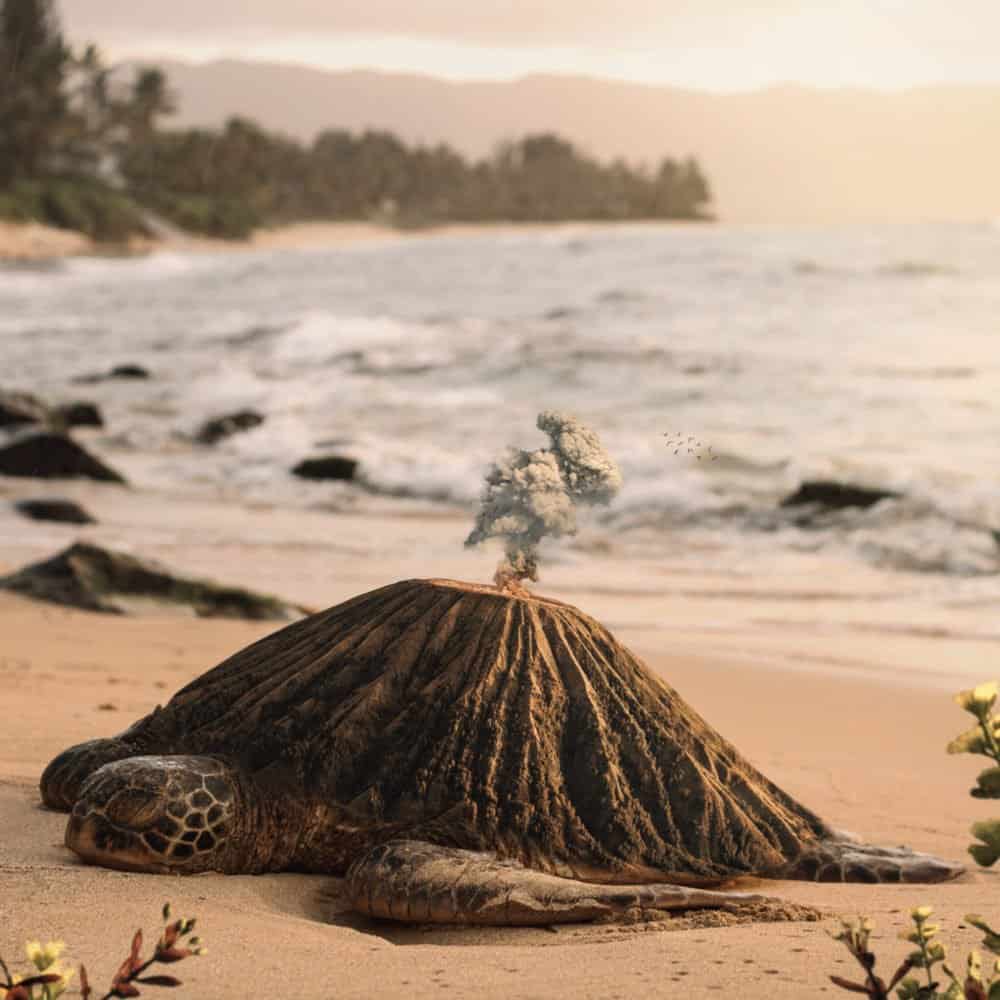
The Turtle’s teachings are so beautiful. So very special. It teaches us that everything you are, everything you need, and everything you bring to the world is inside you, not external, and you carry it with you and are not limited to a place, space, or time. In this Photoshop tutorial, we will learn how to create a surreal scene. First, we’ll add a turtle some Adjustment Layers. Next, we’ll add the volcano to the turtle. Finally, we’ll finish it off with some smoke, fire particles, lights, and a Camera Raw filter.
Preview of Final Image
Tutorial Resources
Step 1
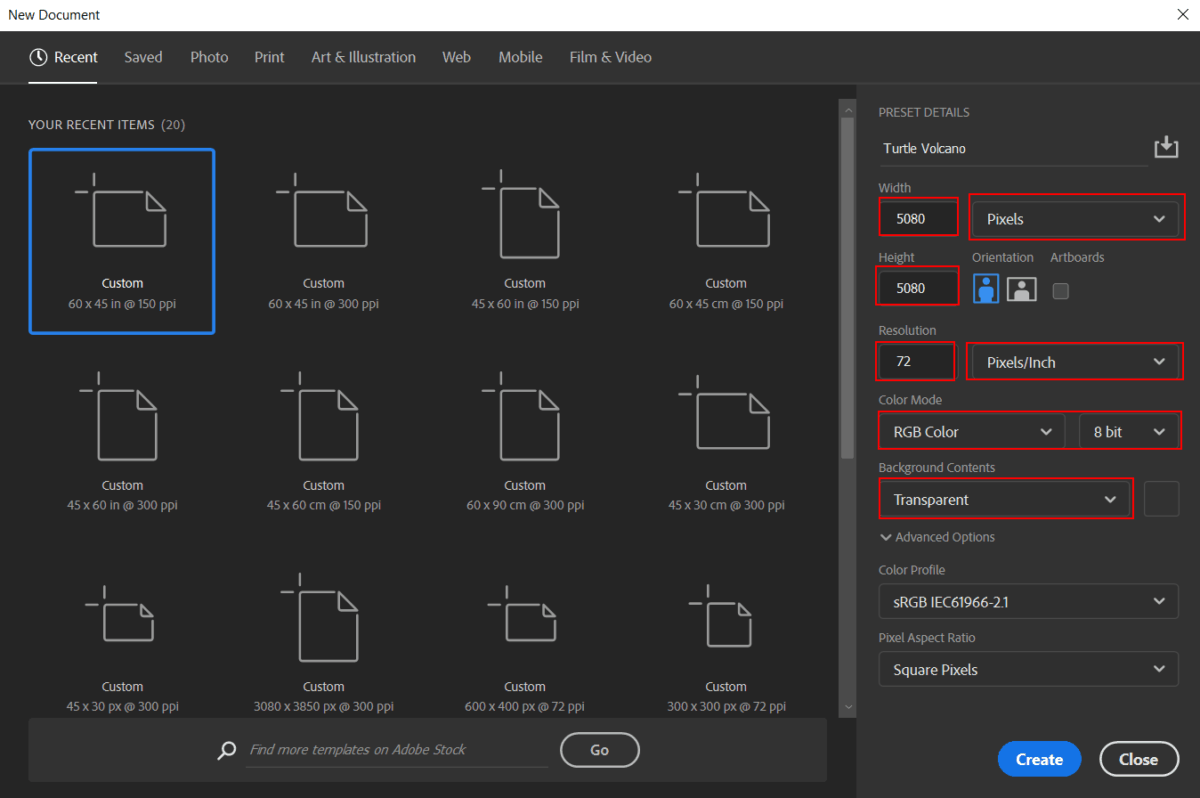
Now, let’s start by creating a new image file, go to the Menu bar and click File > New, and then input the following values on their respective fields
- Preset: Custom
- Width: 5080px
- Height: 5080px
- Resolution: 72
- Color Mode: RGB Color 8-bit
- Background Contents: Transparent
Step 2
Now, place Turtle photo Go to File > Place and select Turtle. Then place it to our work canvas. Then position the image with the transform tool (Ctrl / Cmd + T). Hold Alt + Shift and rasterize like the image below. In Photoshop CC only hold Alt to rasterize all sides together.


Step 3
Add Adjustment Layer “Color Balance”

Step 4
Add Adjustment Layer “Exposure”

Step 5
Now, create some lights. Create a new layer then go to Edit > Fill and Contents: 50% Gray and press Ok.

Now use Brush Tool(B) Soft Round with foreground color white and Brush Opacity set to 10-20%. Then start painting. Take a look at the example in the picture below how much you need to paint, where there is the most white color, draw the most. Then change foreground color to black and paint dark parts. Blend mode change to Overlay.

Step 6
Next we will open Volcano. After you open the image, use Quick Selection Tool(W) and start selecting. After the selection area has been created, simply copy (Ctrl / Cmd + C) and Paste (Ctrl / Cmd + V) it to our work canvas. Then position the image with the transform tool (Ctrl / Cmd + T). Hold Alt + Shift and resterize like image below. In Photoshop CC only hold Alt to resterize al sides together
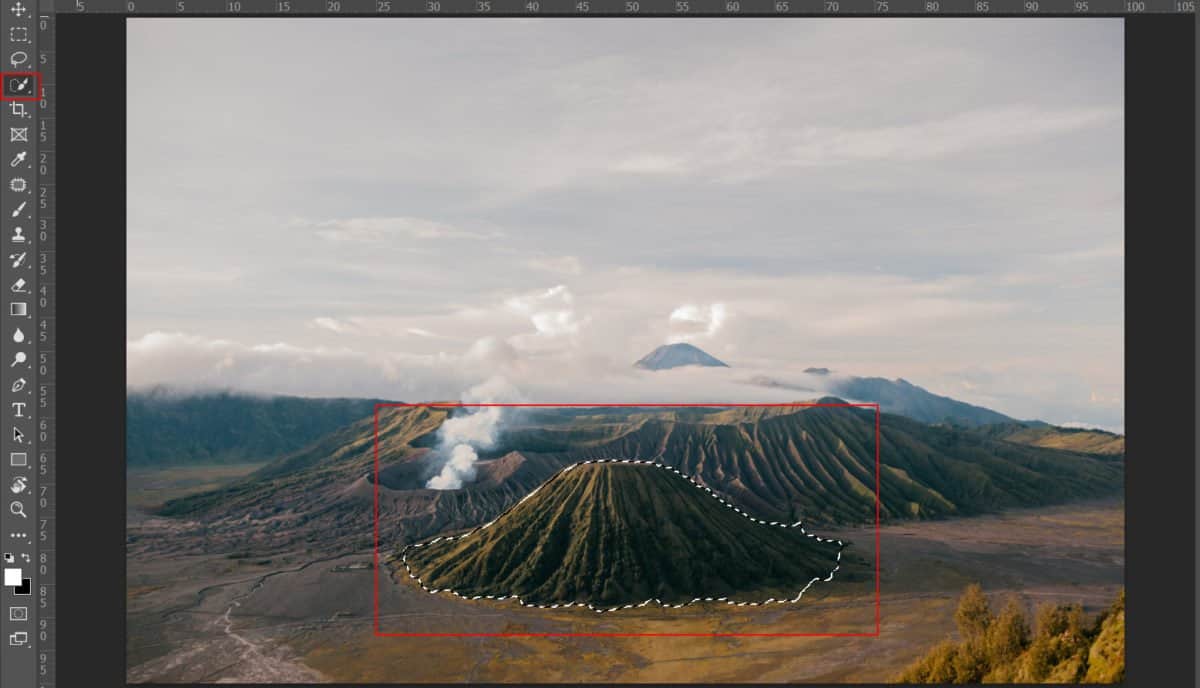

Create a layer mask and use Brush Tool(B) Soft Round with foreground color black and brush/delete some parts. Look at picture below.


Step 7
Add Adjustment Layer “Color Balance”

Step 8
Add Adjustment Layer “Hue/Saturation”

Step 9
Add Adjustment Layer “Exposure”

Step 10
Add Adjustment Layer “Curves”

Step 11
Add Adjustment Layer “Curves”

Step 12
Add Adjustment Layer “Selective Color”

Step 13
Add Adjustment Layer “Curves” and press Ctrl/Cmd + I to invert. Then use Brush Tool(B) Soft Round with foreground color white and paint on right side of Volcano. Opacity set to 50%.


Step 14
Add Adjustment Layer “Curves” and press Ctrl/Cmd + I to invert. Then use Brush Tool(B) Soft Round with foreground color white and paint on left side of Volcano.


Step 15
Create a new layer and change Blend mode to Soft Light and Opacity 30% then use a Brush Tool(B) Soft Round with foreground color white. Then paint to right corner.


Step 16
Now, create more lights. Create a new layer then go to Edit > Fill and Contents: 50% Gray and press Ok.

Now use Brush Tool(B) Soft Round with foreground color white and Brush Opacity set to 10-20%. Then start painting. Take a look at the example in the picture below how much you need to paint, where there is the most white color, draw the most. Then change foreground color to black and paint dark parts. Blend mode change to Overlay.

Step 17
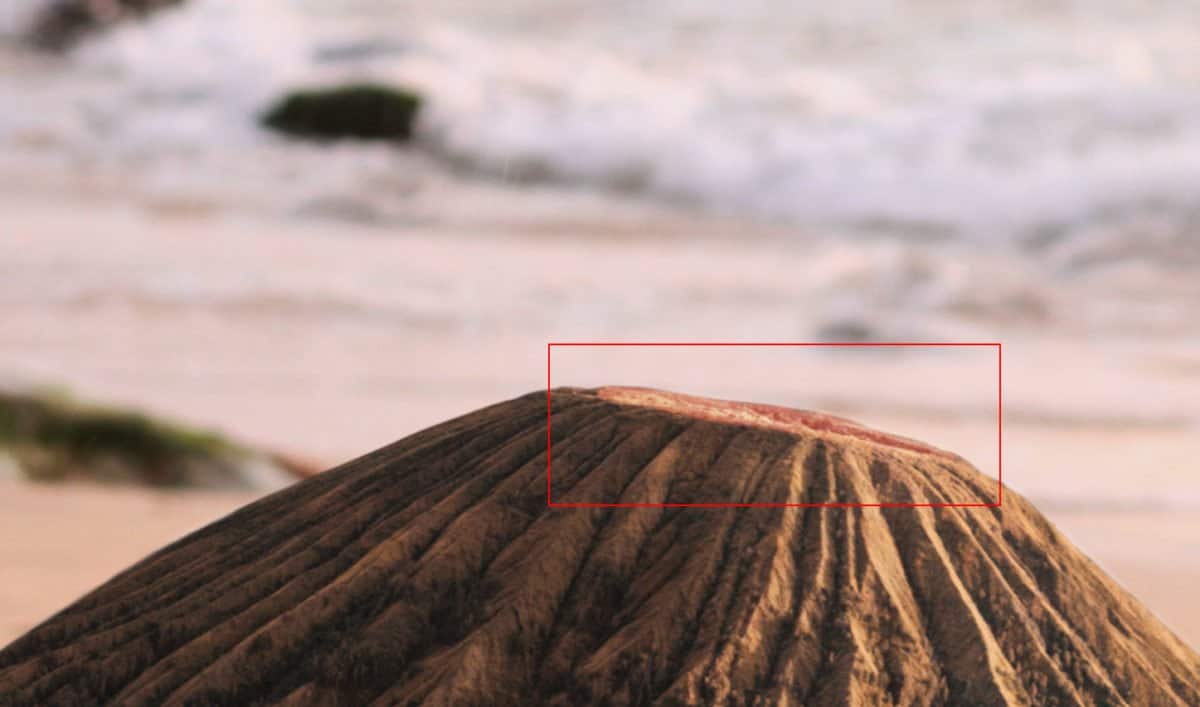
Now create a new layer and use Brush Tool(B) Soft Round with foreground color Red #d03323 and paint on a hole in the volcano. Blend mode change to Color Dodge and Opacity set to 50%.

Step 18
Now we will add smoke, Go to File > Open and select Smoke. After you open the image, use Quick Selection Tool(W) and start selecting. After the selection area has been created, simply copy (Ctrl / Cmd + C) and Paste (Ctrl / Cmd + V) it to our work canvas. Then position the image with the transform tool (Ctrl / Cmd + T). Hold Alt + Shift and resterize like image below. In Photoshop CC only hold Alt to resterize al sides together
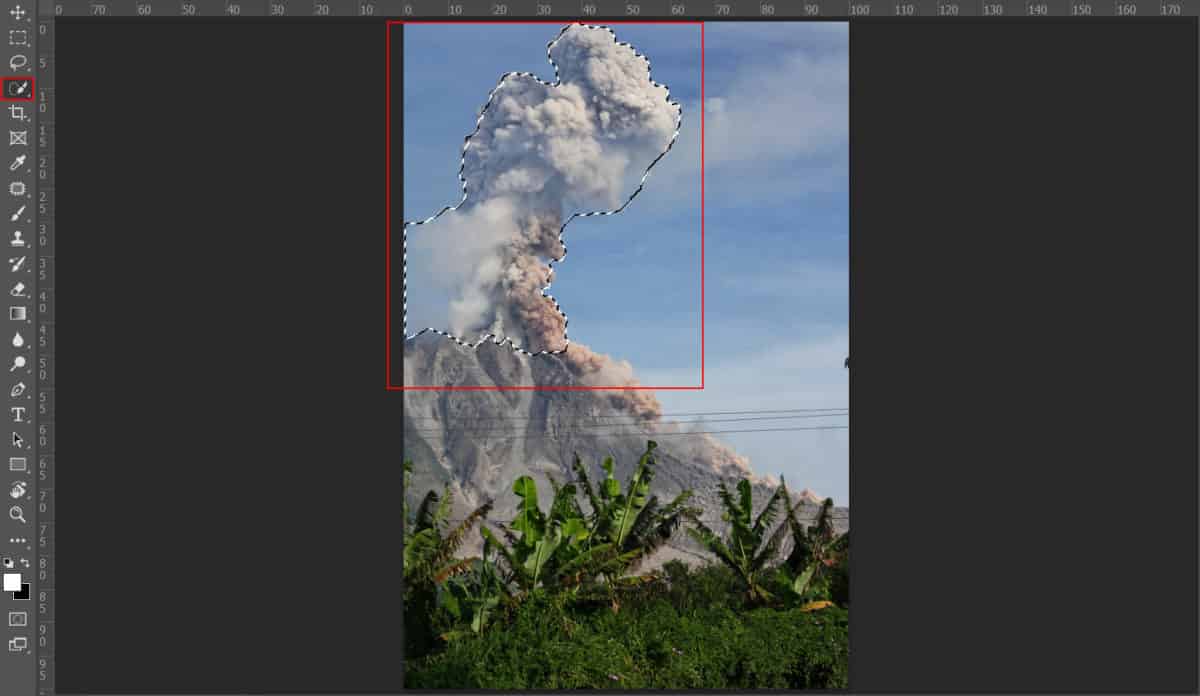

Next, we need Clouds for brush but first we need to import brushes. Select a Brush Tool(B) and right click on background. Now click on the gear icon and Import Brushes (Select a downloaded brush).


Next, use Brush Tool(B) select the first clouds brush and create a layer mask then start painting around the smoke. Look picture below…


Step 19
Add Adjustment Layer “Color Balance”

Step 20
Next create a new layer and use Brush Tool(B) Soft Round with foreground color Red #d24835 and paint on smoke. Blend mode change to Soft Light.


Step 21
Next, add some fire particles, After you open the image, use Rectangular Marquee Tool(M). With the Rectangular Marquee tool, drag over the area you want to select. Hold down Shift as you drag to constrain the marquee to(release the mouse button before you release Shift to keep the selection shape constrained). Blend mode change to Screen.


Create a layer mask and use Brush Tool(B) Soft Round with foreground color black and brush/delete some parts. Look at picture below.


Step 22
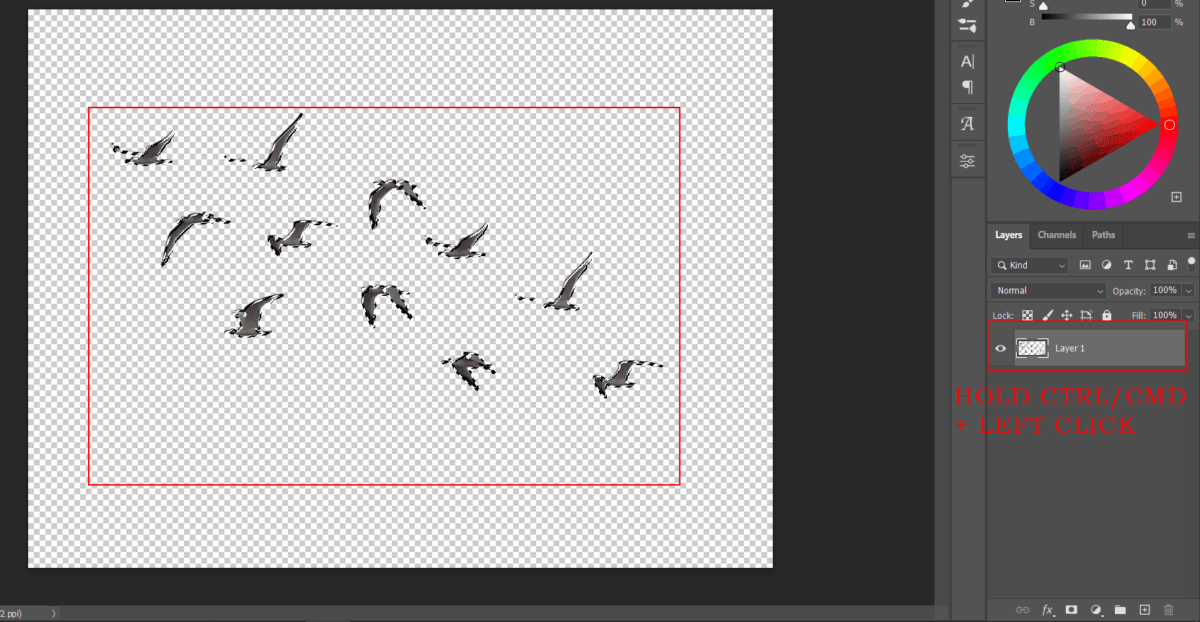
Open Birds and hold Ctrl/Cmd and click on layer and after the selection area has been created, simply copy (Ctrl / Cmd + C) and Paste (Ctrl / Cmd + V) it to our work canvas. Then position the image with the transform tool (Ctrl / Cmd + T). Hold Alt + Shift and resterize like image below. In Photoshop CC only hold Alt to resterize al sides together. Opacity reduce to 55%.

Step 23
Create a new layer and change Blend mode to Soft Light then use a Brush Tool(B) Soft Round with foreground color Yellow #f5cf7d. Then paint to right corner.


Step 24
Next we will open Ivys. After you open the image, use Lasso Tool(L) and select right Ivy. After the selection area has been created, simply copy (Ctrl / Cmd + C) and Paste (Ctrl / Cmd + V) it to our work canvas. Then position the image with the transform tool (Ctrl / Cmd + T). Hold Alt + Shift and resterize like image below. In Photoshop CC only hold Alt to resterize al sides together. Add some blur Go to Filter > Blur > Gaussian Blur and ser radius to 5px.


Step 25
Add Adjustment Layer “Color Balance”

Step 26
Add Adjustment Layer “Hue/Saturation”

Step 27
Add Adjustment Layer “Curves” and press Ctrl/Cmd + I to invert. Then use Brush Tool(B) Soft Round with foreground color white and paint on dark parts.

Step 28
Add Adjustment Layer “Curves” and press Ctrl/Cmd + I to invert. Then use Brush Tool(B) Soft Round with foreground color white and paint on highlights parts.

Step 29
Add Adjustment Layer “Exposure”

Now select Ivy layer and adjustment layer then put to folder (Ctrl/Cmd +G)

Step 30
Now make two more copies (Ctrl/Cmd +J) Then position the image with the transform tool (Ctrl / Cmd + T). Hold Alt + Shift and resterize like image below. In Photoshop CC only hold Alt to resterize al sides together.


Step 31
Add Adjustment Layer “Color Fill”. Blend mode change to Hue with Opacity 30%.

Step 32
Add Adjustment Layer “Gradient Map” Blend mode change to Soft Light with Opacity 50%.

Step 33
Add Adjustment Layer “Color Lookup” 3DLut File set to Futuristic Blake. Opacity reduce to 50%.

Step 34
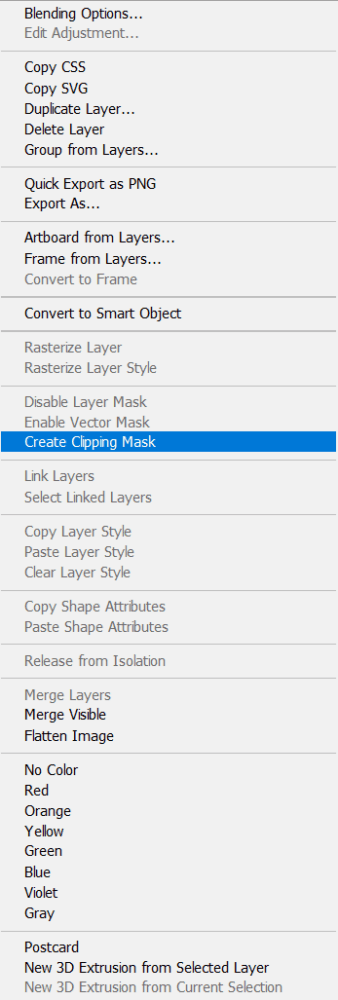
When we finished all this, now merge all layers to one. Slecet the last layer and hold CTRL/CMD + SHIFT + ALT + E. Now we have a final layer, right click on mouse and select Convert to Smart Object. Then go to Filter > Camera RAW Filter. At its most basic, the Photoshop Camera Raw filter allows you to use the functions of the ACR interface at any time within Photoshop.

Step 35
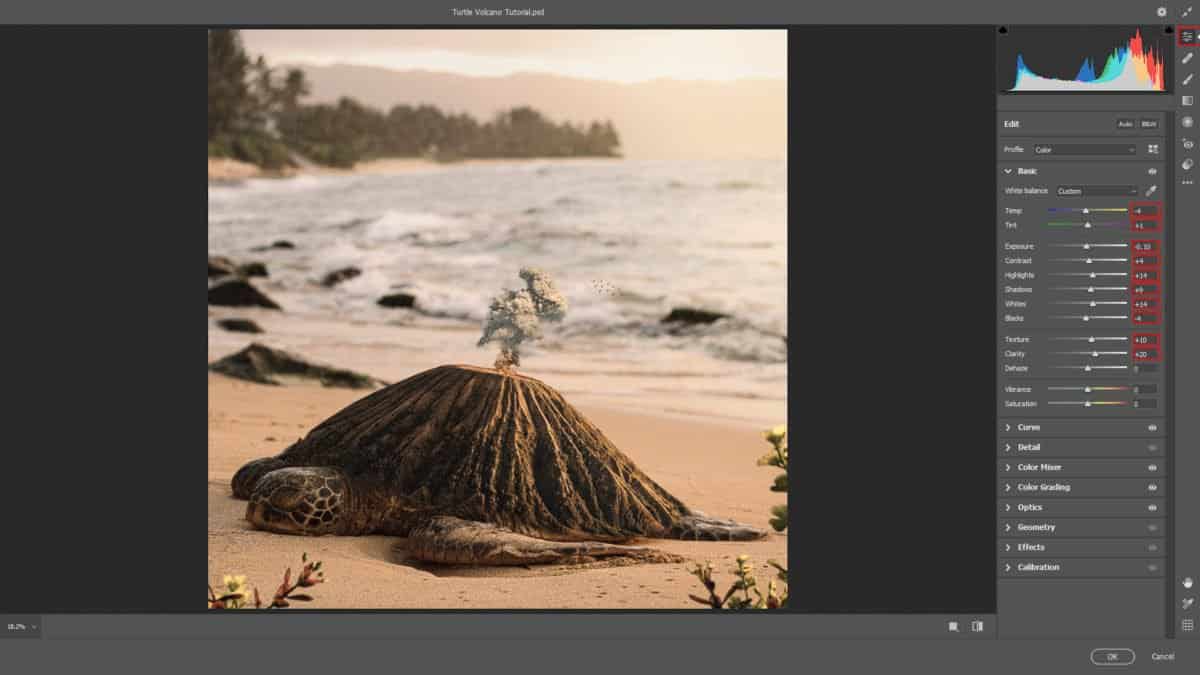
Now in Camera Raw Filter, set the Value: Basic
- Temp: -4
- Tint: +1
- Exposure: -0.10
- Contrast: +4
- Highlights: +14
- Shadows: +9
- Whites: +14
- Blacks: -4
- Texture: +10
- Clarity: +20
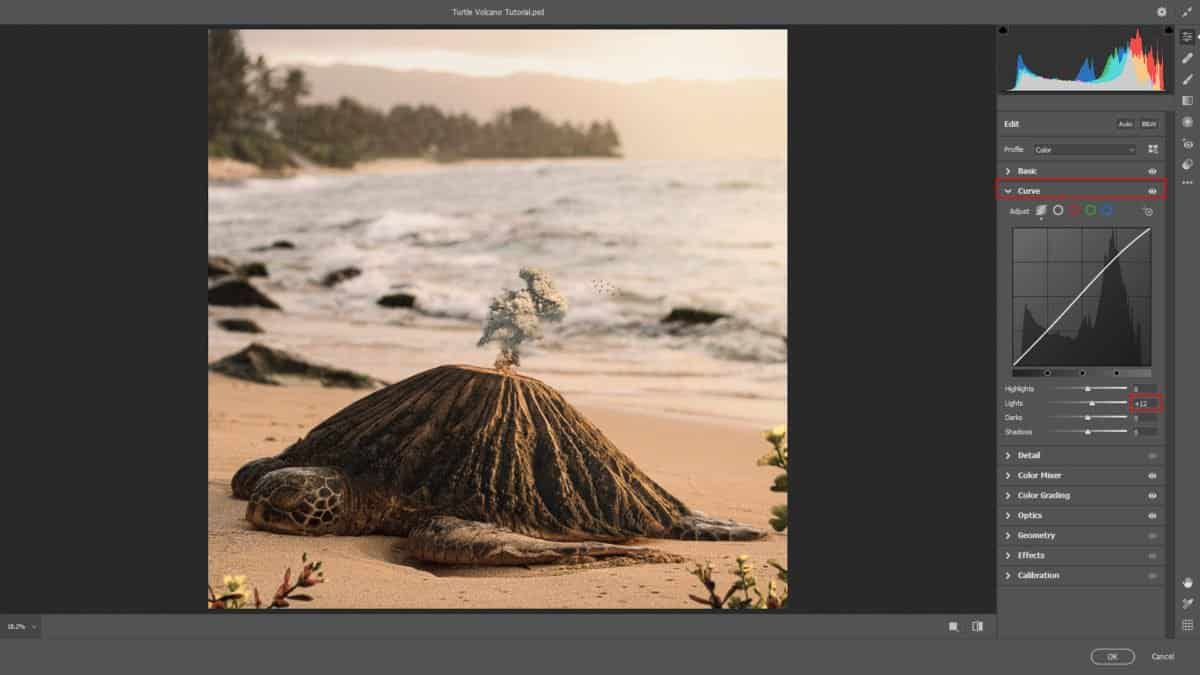
Curve
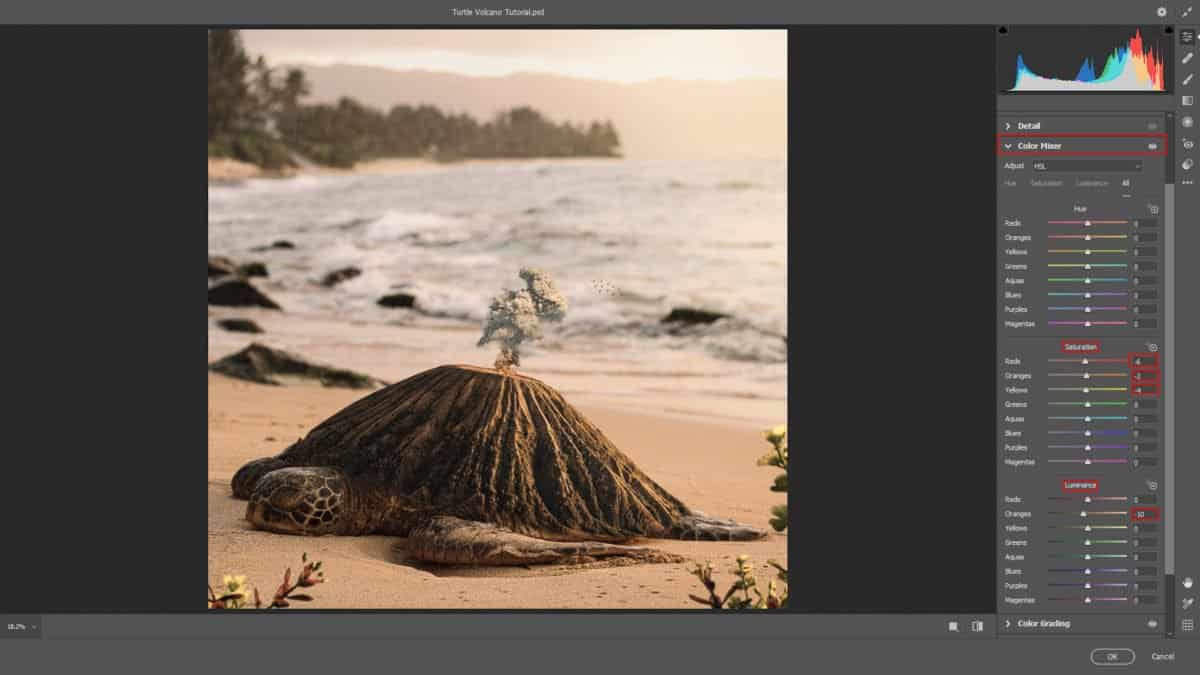
HSL Adjustments
Saturation
- Reds: -6
- Oranges: -2
- Yellows: -4
Luminance
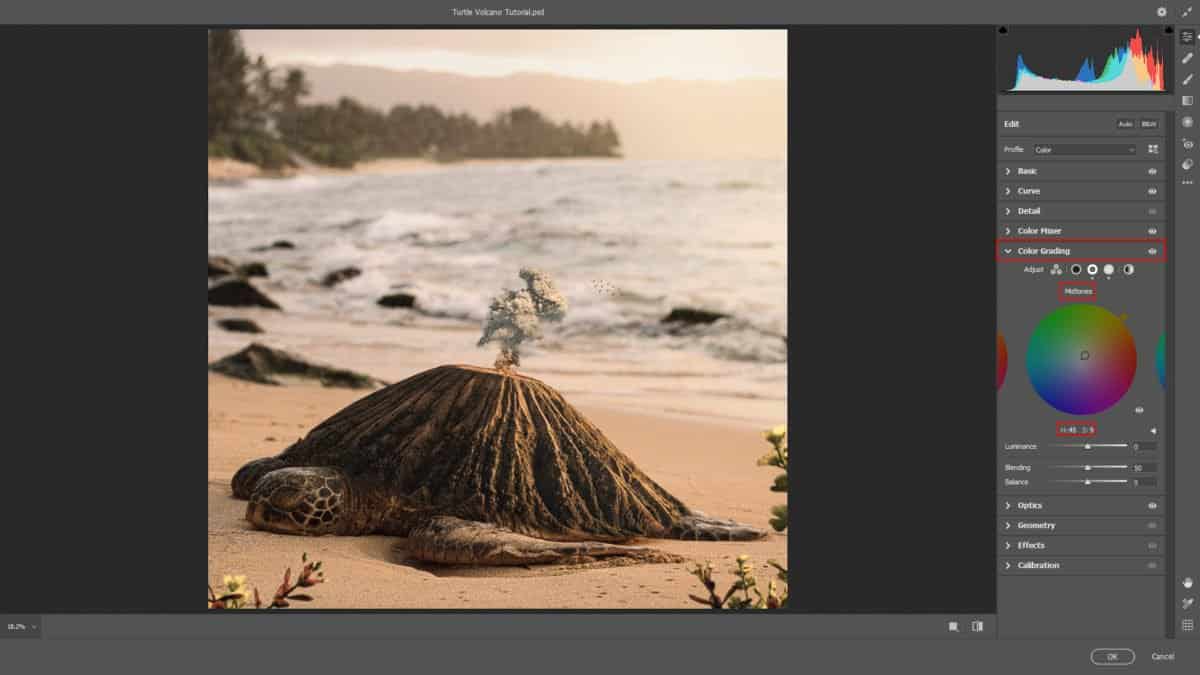
Color Grading
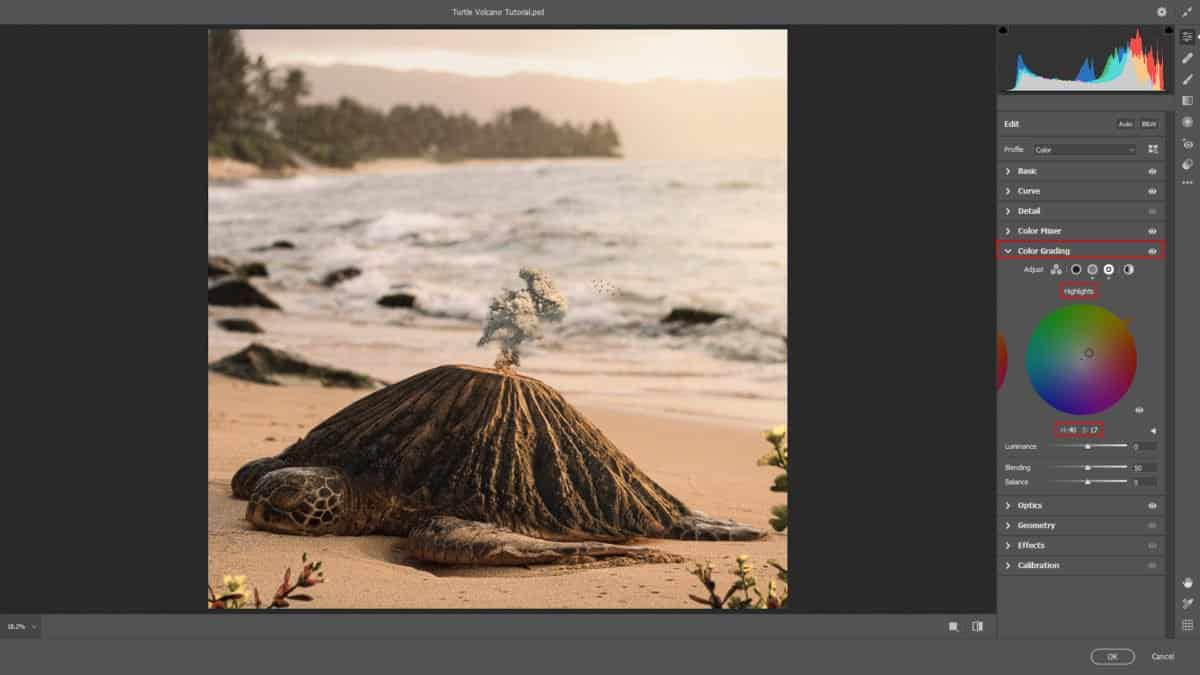
Color Grading
Optics
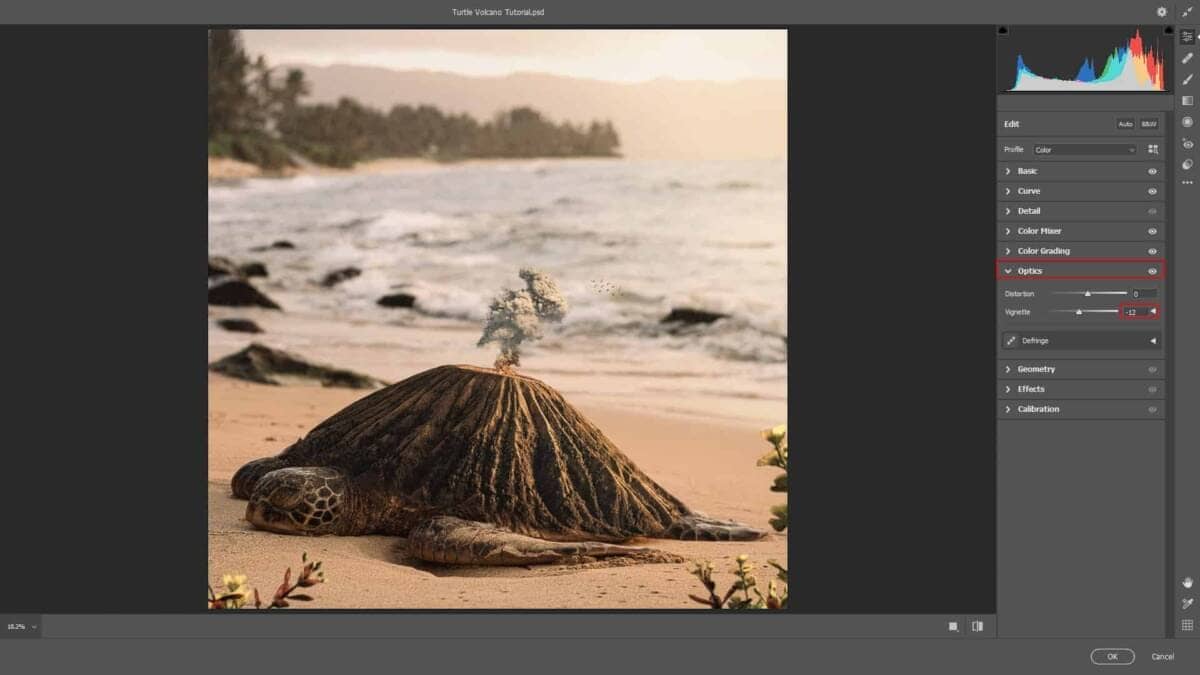
And finally, everything should look like this.

Final Results
